Timbuk2 Messenger Bag to Saddlebag Hack
The Problem
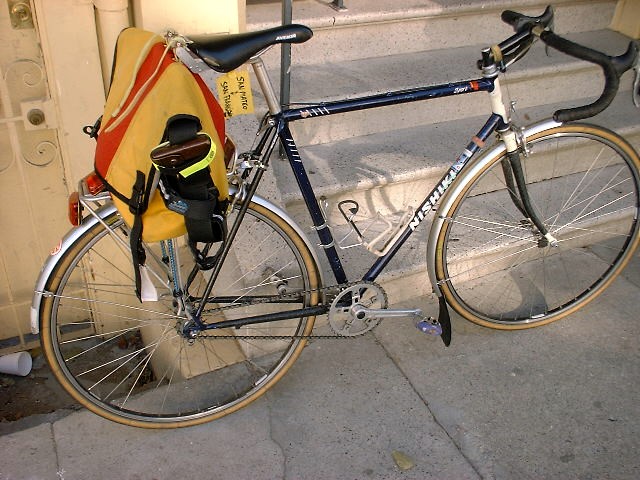
Normally I bike-commute with a Timbuk2 messenger bag. However, now that it's summertime and the mornings are pretty warm, I get an attack of the dreaded SBS (Sweaty Back Syndrome) coupled with a secondary case of SSSM (Sweaty Shoulder Strap Mark), which looks oh-so-unattractive as I march into work in the morning. A solution was needed! At first, I simply bungied the Timbuk onto the top of my bike's rack -- but getting at the contents of the bag (e.g. to stash your sweater on a hot morning) post-bungying is a huge PITA. I tried panniers, but I don't like the way they make my bike feel -- the front end gets squirrelly with all that weight fully at the rear of the bike. A rack trunk isn't big enough, either. If not for the significant cost, a saddlebag might be ideal, but -- as with nearly any bike-mounted bag -- carrying it around is usually A) awkward and B) tags you as a huge bike geek (as if lugging around a helmet and wearing weird shoes wasn't enough). Furthermore, I have some pretty unique requirements for my commute: I don't like to have any bags (weight) mounted to my bike for the ride through SF to Caltrain, since that allows the bike to feel more nimble as I navigate through traffic and bumpy roads; however the second leg of my commute from Caltrain to work passes through low-traffic suburbia and is often significantly warmer, so getting the sweaty messenger bag off my back takes precedence then. I also need something that I can easily mount to the bike, since I need to remove the bag when I take the bike on Caltrain or when it gets locked up somewhere.A few folks on the iBOB list have mentioned how they've attached shoulder straps to their Carradice saddlebags to make off-bike portage easier. I thought on this for awhile, and decided to approach this problem from the opposite angle: instead of making a bike-bag carryable, I'd convert a carryable bag into a bike-bag! (and save $$$ in the process, since I already owned the Timbuk2 bag) I measured my Timbuk2 (incidentally, mine's the "DeeDog" size, about 28 L capacity) and found that it's roughly the same dimensions as the mid-sized Carradice saddlebags. This discovery fueled my imagination. Problem #1 was that I don't use a saddle with bag-loops, so I had to come up with an alternative solution.
No Bag Loops?!?
I spent a lot of time poking around on the web, looking for ways people have mounted saddlebags to non-Brooks/loopless saddles. Wallingford Bicycle Parts proved an invaluable resource, since they list the Carradice Saddlebag Clamp -- which you could simply purchase and save yourself the hassle if your saddle is high enough, mine wasn't and besides, I'm thrifty. They also have a nice page of Carradice Hacks, featuring pictures of alternative bag mountings and quick-release devices from several inventive cyclists. Additionally, Wallingford sponsors the excellent Brooks Saddle Archives which has a section devoted to various vintage saddlebag mounts. I quickly took interest in "Mr. Lord's Rack" since a similar device would position the bag mount exactly where I'd need it for my bike and bag (a bit of an "uplift"). I combined ideas from this rack and from Mike Sherman's pinned quick-release in my final design.I took some measurements from Brooks saddles to determine the positioning of their bag loops: I decided that 130mm outside-to-outside was a reasonable distance.
 My bag mount is fabricated from 3/4" wide aluminum flat bar stock. (A
3-foot length cost about $3.20 at my local Home Depot.) Like Mike
Sherman's mount and the Carradice Clamp, my mount clamps to the saddle
rails with small bent tabs and bolts/nuts/washers. I cut two 1-inch
tabs from the bar, and drilled a 1/4" hole in each tab about 3/8" in
from one end. I then clamped the tabs in a vice so that only 1/4" of
the non-hole side was exposed, and wacked at that with a hammer (aka:
microfine adjustment tool) to give it a slight bend. I used
M6x25mm bolts with nylock nuts and 4 washers to complete this part.
My bag mount is fabricated from 3/4" wide aluminum flat bar stock. (A
3-foot length cost about $3.20 at my local Home Depot.) Like Mike
Sherman's mount and the Carradice Clamp, my mount clamps to the saddle
rails with small bent tabs and bolts/nuts/washers. I cut two 1-inch
tabs from the bar, and drilled a 1/4" hole in each tab about 3/8" in
from one end. I then clamped the tabs in a vice so that only 1/4" of
the non-hole side was exposed, and wacked at that with a hammer (aka:
microfine adjustment tool) to give it a slight bend. I used
M6x25mm bolts with nylock nuts and 4 washers to complete this part.
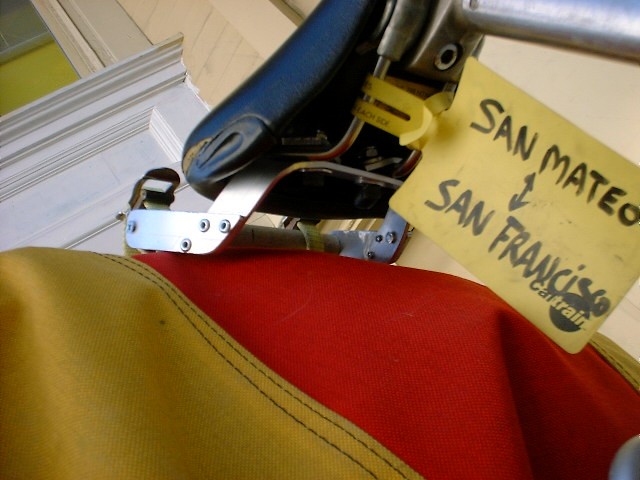
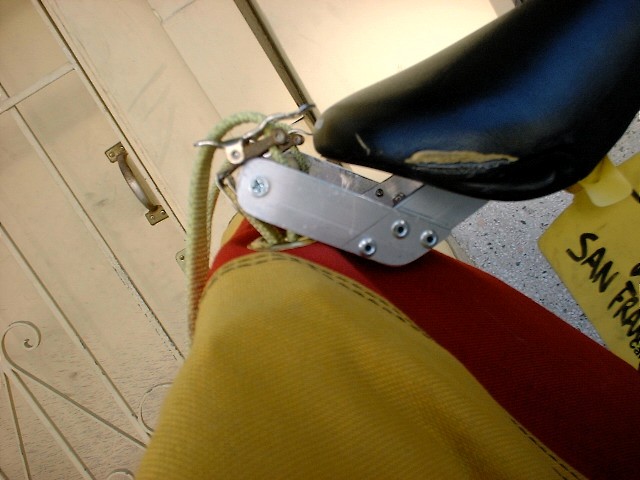
I measured the distance on the underside of the saddle at the rear edge, where I wanted the mount to clamp to the rails -- I think this measurement came to about 5 inches. I didn't know how much material I'd need for the arms, so I guessed at 8 inches per side. Adding these numbers together plus a little extra gives 22 inches -- I cut this amount from the aluminum bar, and then marked the centerline. I made additional marks at 2.5 inches out from the centerline, and bent the bar into a large U-shape. I held this up against the saddle rails and made markings for holes to match the clamping tabs. After couple more drill passes, I was able to clamp everything to the saddle.
 At this point, the 8" arms of the U are sticking out and
down towards the rear axle. This will likely depend on your saddle,
but the rails of my saddle make a 45-degree bend upwards from
horizontal after they pass through the seatpost clamp. So, I simply
grabbed the 8" arms and bent them upwards until they were level. I
eyeballed where I thought the bag straps would ultimately go, and
measured out from the saddle (3 inches?), marking each arm. I took
the cutoffs from each arm and held them at roughly a 45-degree angle
along the back of the saddle to eyeball the "uplift" to the bag mount.
I cut those to size after a few more measurements and marks. I got
the idea from Mike Sherman's quick-release bag mount, using pop-rivets
to attach the arm segments together. I used 3 1/8-inch steel rivets
per side. Note: Clamp the two segments of each arm together when
drilling the 3 rivet holes -- this keeps the pieces and the holes
aligned correctly.
At this point, the 8" arms of the U are sticking out and
down towards the rear axle. This will likely depend on your saddle,
but the rails of my saddle make a 45-degree bend upwards from
horizontal after they pass through the seatpost clamp. So, I simply
grabbed the 8" arms and bent them upwards until they were level. I
eyeballed where I thought the bag straps would ultimately go, and
measured out from the saddle (3 inches?), marking each arm. I took
the cutoffs from each arm and held them at roughly a 45-degree angle
along the back of the saddle to eyeball the "uplift" to the bag mount.
I cut those to size after a few more measurements and marks. I got
the idea from Mike Sherman's quick-release bag mount, using pop-rivets
to attach the arm segments together. I used 3 1/8-inch steel rivets
per side. Note: Clamp the two segments of each arm together when
drilling the 3 rivet holes -- this keeps the pieces and the holes
aligned correctly.
Carradice saddlebags use a 5/8" poplar dowel for their internal transverse support strut, so that's what I used for the cross bar on my bag mount. I drilled two more holes at the ends of the arms, and I cut a 130mm length of dowel, and mounted it to the arms using some wood screws. I hit all the pointy/rough edges with a file to round things off, both for safety and appearance!
Mounting the Bag
 Ok, the hard part's done. Now
all I needed to do was make some holes in my trusty Timbuk. I bought
a 1/2-inch grommet kit, and installed some grommets near the top of
the bag -- near where the flap folds over. I already had some old toe
straps to use to attach the bag, which are 1/2" wide. The trick here
is to NOT put the holes low enough that you can feel them on your back
when wearing the bag in the normal manner -- but you also need to put
them up high enough that the bag hangs from the bag mount and rests on
the top of your rear rack (if you're using one). I reinforced the
grommets on the inside using a 6-inch piece of MTB innertube.
Ok, the hard part's done. Now
all I needed to do was make some holes in my trusty Timbuk. I bought
a 1/2-inch grommet kit, and installed some grommets near the top of
the bag -- near where the flap folds over. I already had some old toe
straps to use to attach the bag, which are 1/2" wide. The trick here
is to NOT put the holes low enough that you can feel them on your back
when wearing the bag in the normal manner -- but you also need to put
them up high enough that the bag hangs from the bag mount and rests on
the top of your rear rack (if you're using one). I reinforced the
grommets on the inside using a 6-inch piece of MTB innertube.
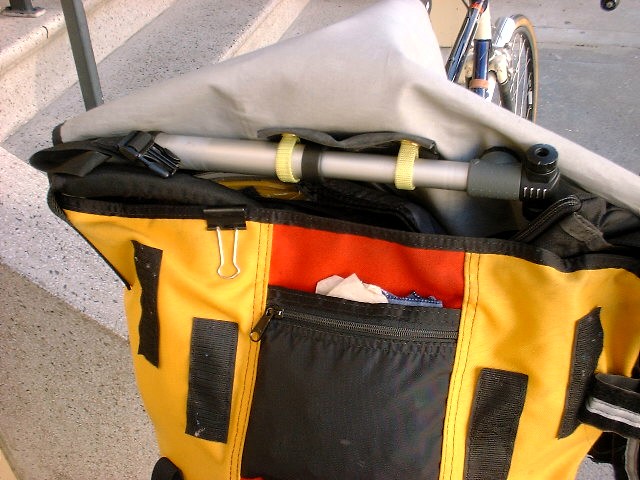
I was going to use another piece of 5/8-inch dowel as a transverse support inside the Timbuk bag, but I tried that out and found it made the bag really uncomfortable to wear across your back. And removing the dowel every time is just too cumbersome. I started thinking of a way to make a collapsible rod, but then realized that I already had that inside my bag -- my trusty Crank Bros. Power Pump! It's made of aluminum alloy so it's plenty beefy enough, and I can stretch it out when using the bag in saddlebag mode, and collapse it down when wearing the bag, and I don't even notice it's there.
When you use the bag in saddlebag mode, just reconnect the cross strap to the shoulder strap, and then tuck the shoulder strap inside the bag's flap -- this keeps it out of the way and prevents it from snagging on something. Of course, you also want to make sure the bag's flap-lid straps aren't dangling down close to your rear spokes, either.
I should also note that the proper way to loop the toe straps is with the buckles on the inside of the bag. However, I like 'em on the outside, as it allows quick mounting/unmounting of the bag, for all the reasons I outlined earlier.
Here's an approximate final cost breakdown:
  $10.00 - 1/2" grommet kit
    3.20 - 3/4" aluminum bar
    2.00 - 5/8" poplar dowel
    3.00 - M6 nuts/bolts
       0 - washers (already had)
       0 - toe straps (already had)
       0 - Timbuk2 bag (already had)
  ----------------------------------
  $18.00 total
